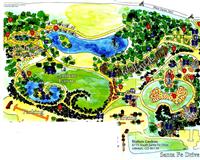
 Learn How to Plan Ornamental Gardens
The Lessons
There are 10 lessons in this course:
- Site Appraisal, Interpretation and Risk Assessment
- Preparing Site Plans and Specifications
- Influence of Site Characteristics
- The Use of Hard Landscape Features
- Setting out a Site to Scale Plans and Drawings
- Soil Handling and Storage
- Land Drainage Systems
- Ground Preparation Techniques
- Construction of Paths and Patios
- Construction of Steps, Ramps, Dwarf Walls and Fences
 Aims of the Course
- Explain how to conduct a site appraisal and interpret the results.
- Conduct risk assessments associated with planning layout and construction of ornamental gardens
- Produce and interpret site plans and specifications using basic survey measurements.
- Explain how site characteristics may influence choice of garden design style.
- Evaluate and explain the contribution made by hard landscape features to design and function
- Describe the practical procedures for setting out a site to scale plans and drawings.
- Describe and explain the reasons for correct soil moving and storage during construction works.
- Explain the factors which determine the design and specification of land drainage systems and describe procedures for setting out and installing land drainage.
- Explain requirements for a range of ground preparation techniques for different landscape features.
- Specify a range of materials and outline procedures for construction of paths and patios.
- Specify a range of materials and outline procedures for construction of Steps, Ramps, Dwarf Walls and Fences
GARDEN WALLS: YOUR CHOICES
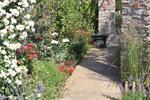 Walls and fences can be used to define spaces within a garden, to direct or control movement (or people, children, pets etc), to retain embankments, to mark a boundary and to provide protection from wind. And just as importantly, they can give your garden aesthetic appeal and make a statement about your garden.
The location and nature of a wall or fence can have a dramatic effect upon both the appearance and the use of a garden. A tall rendered brick wall at the front of the garden will give your garden a formal, stylish appearance and will ensure the garden is private and the house is secure. A rustic, stone wall which does little to deter onlookers is better suited to bush or country gardens, where it will effectively keep out livestock.
Location
The location may often seem obvious, but if you want the best effect, think about this very carefully. A wall or fence might be used for:
- Defining boundaries
- Creating embankments
- Creating a courtyard
- Enclosing a pool or patio
- Edging a road/drive way
- Edging a garden bed
- Surrounding a pool or pond
- Surrounding a gazebo or pergola
- Backing a feature (eg. a free-standing wall in a garden bed behind a statue)
Built in the wrong place, walls and fences can cause problems:
- by restricting access, or blocking desired views
- slowing the wind (that is used to dry clothes), or by tunneling wind in certain directions
- creating undesirable micro climates…shady spots, moist spots, etc.
The choices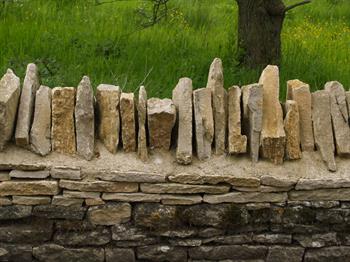
Consider the following when deciding what type of wall or fence will best suit your needs:
- How high do you want it to be. If you want it to provide privacy it will need to be at least 1.8m tall. If you want it simply to define parts of a garden, without impeding views then it might only be 30cm or so high.
- What type of material? Do you want it made of brick, stone, timber, wire mesh? The different materials will vary in strength, appearance, cost, lifespan, construction methods, and maintenance requirements. How much time, effort and money are you prepared to spend? Will it suit (fit in) your garden?
- Thickness – how thick do you want the wall to be. This will often depend on the types of materials being used in the walls construction, and to what use you are putting the wall too (e.g. free standing wall versus retaining wall).
- Will the wall or fence be solid or “see through”.
- Drainage will be an important factor for some types of walls, particularly retaining walls. Will you need to install drainage systems behind retaining walls, or through solid walls such as brick or mortared stone ones.
- What is planted nearby (are there plants that may damage the wall or fence)
DIFFERENT IDEAS TO TRY
- Terraced slopes with steps between them – the sets of steps can be aligned to create a more formal appearance (looking up or down the whole series of steps) framed by plants. Or have the location of steps different for each terrace so that people have to walk along at least part of each terraced area to get to the next set of steps.
- A rock-walled maze (for a bit of fun) – as an alternative to hedges. This will be initially more expensive and time consuming to create but will require less maintenance than hedges (ie. pruning). The walls would need to be very stable in case children try to climb over them finding their way out, or can be built low enough that people can see the way out if desired.
- Alcoves created along the wall, perhaps a seat placed at a strategic location as part of the wall (rocks used to create a bench) to take in views, or provide a resting point.
BUILDING WALLS
This issue we will focus on building stone walls. Subsequent issues will cover the building of other wall types, such as brick walls.
STONE WALLS
 There are two main types of stone wall. These are dry stone walls, where the stones are stacked in such away that they create a stable wall, without the addition of a stabilising/joining material such as mortar, and mortared stone walls where the stones/rocks are stabilised (held in place) by the use of mortar.
Different Possibilities For Stone Walls:
- Rubble walls...uncut stone is used.
- Ashlar walls...cut stone is used.
- Veneer walls...a layer of stones are cemented to the face of a previously constructed wall.
Dry Stone Walls (free-standing)
A free-standing stone wall is built by stacking rocks or blocks one on top of another without using mortar, concrete or any other ‘joining’ material to stick them together. Providing the stones are stacked correctly, the wall will be very durable and strong. These walls generally have two side-by -side rows of stacked stones linked by joining stones, and further stabilised by capping stones.
As a general guide, the base of this type of wall should ideally be twice as wide as the main section of the wall. This spreads the weight and helps prevent the wall sinking. The foundation stones should be large and flat-bottomed with progressively smaller stones used to build up the wall. Building this type of wall can be a real art, and may take a lot of practice to get it right. Don’t be afraid to remove any stones and redo sections of the wall until you are happy. Also be prepared for a lot of heavy work – you are best to take your time, get help placing the heavier rocks, and make sure you use good lifting techniques (keep your back as straight as possible when lifting, rise and lower through your knees, and avoid twisting while lifting or carrying the rocks).
How To Proceed
1. Use a string line to mark the position of the wall.
2. If the ground is soft dig a trench 10-20 cm deep to remove grass and loose earth. (This may not be necessary on stony, compacted soil). The large base rocks can be placed directly in the trench, or a layer of gravel placed there, which is then packed down to create a more solid base on which to place the foundation stones. A foundation of concrete or mortar might also be used, but this should be well covered by the foundation stones so that it cannot be seen.
3. Place the largest stones first, with the flattest side facing down. The longest side of each stone should be running into the centre of the wall, not along the face.
4. Place each stone so that the joints below are covered. These cross joints will strengthen the wall
5. Fill gaps with smaller ‘hearting’ stones but don’t use too many as this will weaken the wall.
6. Use ‘through stones’ to stabilise the wall – these are large stones which are laid through the wall from one side to the other (joining side-by-side stacks of stones). Place them about half way up the wall, at approximately one metre intervals along the wall. Build up both sides of the wall at the same time. Avoid having any horizontal or vertical lines between the stones (e.g. stones stacked directly one on top of each other). The aim is to overlap stones as much as possible so that they hold each other in position.
7. The top of the wall can be finished with ‘coping’ stones – these are flat capping stones which cover the tops of both sides of the wall, binding the wall together and giving it a neat finish. They are laid side by side and can be wedged in place with small V-shaped pieces of stone.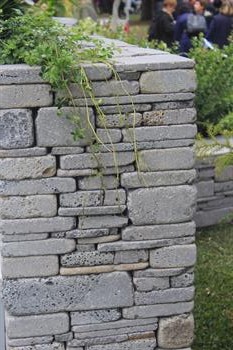
Mortared Stone Retaining Wall
Mortared walls can be free standing or used to create embankments (as retaining walls). A similar process is used to that used to create dry stone walls except that the gaps between the stones or blocks are filled with mortar. A strip foundation should be laid first, with steel reinforcing set in concrete. The stones/blocks are then laid on top. To further strengthen walls used for retaining (loose soil, embankments, etc.), make sure sections of the wall are run backwards into the embankment at occasional intervals. These walls can be effectively cemented with a mortar mix of 3 parts fine sand to 1 part cement.
Positioning of retaining walls to minimise soil movement
- All retaining walls should slope back into the embankment (ie. this slope is called "the batter"). A minimum batter should be approx. 1 cm for every 6 cm in height. Ideally, the ground at both the top and bottom of a wall should be fairly flat, to minimise erosion.
- Good drainage is necessary both above and below the wall. This factor is obviously more critical in clay soils. A spoon drain may be built at both the top and bottom of the wall. Sub-surface drains might also be used in these positions. If surface drainage is allowed to run over the top of the wall, it can cause erosion behind and at the base of the wall, VERY QUICKLY.
