STUDY AUSTRALIAN WILD FLOWERS AND SHRUBS
This course deals with both woody (hard wooded) and herbaceous (soft wooded), low growing Australian Native Plants, which bear showy wild flowers.
- Learn about Australia's beautiful wild flowers including cultivation and commercial applications.
- Develop your ability to identify, select, cultivate and explain commercial applications for appropriate varieties of low growing Australian native flowering plants in a variety of situations.
Lesson Structure
There are 8 lessons in this course:
- Introduction
- Review of the system of plant identification, general characteristics of the group, information contacts (ie: nurseries, seed, clubs, etc.)
- Growing Conditions
- Planting, staking, mulching, watering, pest & disease, feeding, pruning, propagation, protection from wind, salt air, environmental zones, etc.
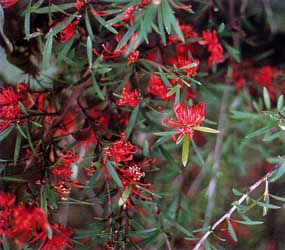
- The Heaths and similar plants
- Myrtaceae family, etc. Thryptomene, Bauera, Astartea, Grevilleas, Telopea, Leptospermum, etc.
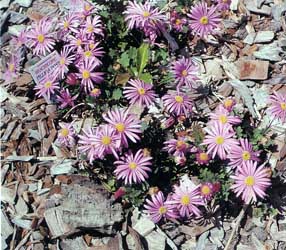
- The Daisy Family
- Identification and growing needs Helichrysum, Helipterum, Celmisia, Brachyscome, Olearia, etc.
- The Legumes
- Fabaceae, Mimosaceae and Caesalpinaceae families. Kennedya, Pultenaea, Acacia, etc.
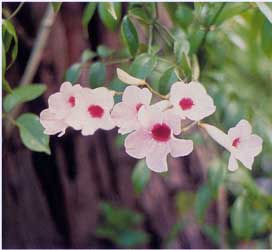
- Other common groups
- Boronia, Crowea, Clematis, Viola, etc.
- The Monocots
- Grasses, native irises, Anigozanthus, Xanthorrhea, etc.
- Commercial Applications
Each lesson culminates in an assignment which is submitted to the school, marked by the school's tutors and returned to you with any relevant suggestions, comments, and if necessary, extra reading.
Aims
- Distinguish between different types of native wild flowers.
- Determine reliable information about the identification and culture of Australian wild flowers.
- Specify general cultural practices, including propagation, for different families of Australian native wild flowers.
- Explain the characteristics, including identification and culture, of heath like native wild flowers; with reference to both proteaceous and myrtaceous plants.
- Explain the characteristics, including their identification, culture and use, of wild flowers in the Asteraceae (ie. Daisy) family.
- Explain the characteristics, including identification, culture and use, of different legume wild flower genera.
- Explain the characteristics, including identification, culture and use, of different Australian native monocotyledons (ie. narrow-leaved plants).
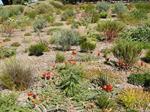
- Prepare a planting design featuring Australian wild flowers.
- Develop a cut flower production plan, for a selected Australian wild flower.
What You Will Do
- Distinguish, using illustrations and minimum but adequate comments, between different plant families within which Australian native wildflowers are commonly found,including the following: Asteraceae, Caesalpiniaceae, Dilleniaceae, Epacridaceae, Ericaceae, Fabaceae, Poaceae, Haemodoraceae, Iridaceae, Lamiaceae, Liliaceae, Mimosaceae, Myrtaceae, Orchidaceae, Proteaceae, Rutaceae and Thymelaceae.
- Prepare a collection of wild flower specimens (or illustrations), not collected elsewhere with information included on culture and use.
- Compile a resource file of sources of information on native wild flowers.
- Develop criteria for distinguishing the accuracy of information, relating to native wild flowers.
- Determine four reliable sources, of accurately named Australian plant material, including both seed and plants.
- Develop a procedure for researching cultural information on an unfamiliar species of Australian wild flower, listing specific information sources in order of importance.
- Explain two different ways to plant different specified wild flower plants
- Compare the use of different types of mulch, around specified wild flowers.
- Explain appropriate techniques for watering wild flowers, in a specified garden.
- Compare the pruning of two specified wild flowers, from two different taxonomic families.
- Explain why three different wild flower plants have different preferences in soils.
- Compare the use of different types of fertiliser on wild flower plants.
- Propagate wild flower plants using different techniques (eg. Seed, Cuttings).
- Identify pests and diseases afflicting different wild flowers.
- Discuss the culture of different wild flower plants.
- Distinguish, using illustrations and minimum but adequate comments, between genera which include heath-like native plants, including:
- Epacris
- Micromyrtus
- Thryptomene
- Verticordia
- Grevillea
- Isopogon
- Melaleuca
- Pimelia.
- Prepare a poster size chart which compares the characteristics, including:
- Appearance
- Propagation
- Lifespan
- Soil requirements
- Environmental requirements
- Pests & diseases
- Special cultural techniques of various different genera of heath-like wild flowers.
- Describe the unique characteristics of different genera of wild flowers
- Dissect, draw and label the parts of a daisy flower, including:
- Ligule
- Stigma
- Style
- Anther
- Corolla tube
- Pappus
- Ovary
- Receptacle
- Disc floret
- Ray floret.
- Distinguish, using illustrations, between three different native daisy genera.
- Design a garden bed using only Australian native daisy flowers which will grow in your locality, and will flower for an optimum period of months over the year.
- Produce dried flowers from an appropriate native plant variety in the Asteraceae family.
- Distinguish between Fabaceae, Caesalpiniaceae & Mimosaceae families characteristics.
- List fifteen of the more commonly grown native legume genera.
- Describe various uses for specific legume native genera, including:
- Soil improvement
- Flower colour
- Weed suppression
- Erosion control
- Decorative foliage
- Screening as a climber.
- Write an essay comparing the characteristics of four different Australian Native legume genera.
- List twenty species of low growing native monocotyledons suited to culture in your locality
- Describe various uses for monocotyledon native species listed, including:
- Soil improvement
- Flower colour
- Weed suppression
- Erosion control
- Decorative foliage
- Screening.
- Design a garden bed using only Australian native monocotyledons which will grow in your locality; to be colourful for an optimum period of months during the year.
- Determine applications for five different species of wild flowers, in amenity horticulture.
- Grow a combination of three different wild flower varieties in an area of four square metres, to achieve an aesthetically attractive display of colour.
- Prepare a scale drawing for a design of a garden bed which features wild flowers, and creates a high impact colourful display for a period of at least two months.
- Develop criteria for selection of a wild flower species to grow as a commercial crop.
- Determine different species of wild flowers which have potential as a commercial cut flower crop, in your locality.
- Design and conduct simple trial for testing the performance of three specimens of a selected wild flower species, and summarise the trial procedure, detailing:
- What to grow
- Schedule of cultural tasks
- List of equipment and materials required
- Evaluate the commercial potential of the different cut flowers.
- Devise a crop production schedule for a specified cut flower crop, detailing all essential work tasks.

TIPS FOR PLANTING A NATIVE PLANT
The first step is to prepare the soil and to remove any weeds (see sections on improving soils and weed control). Plants in pots can be transplanted into the ground as follows:
Basic Planting Procedure
1. Thoroughly soak the plant in the pot and allow it to drain. This helps the plant come out of the pot more easily.
2. Dig a hole at least twice the width of the pot, and slightly deeper than the depth of the pot. Roughen the sides of the hole with the edge of the spade; this is especially important in hard-packed clay soils.
3. Fill in one-third of the hole, using the same soil dug from the hole.
4. Carefully remove the plant from the pot.
5. Loosen any exposed roots (i.e. if most of the roots are inside the soil ball, you might not need to do much. If there is a tight mass of roots on the outside of the soil ball you may need to break a centimetre or so into the ball all over; this is best done with a sharp knife or secateurs.) Cut into the root ball from the bottom to the top in four sections around the ball. A hose can also be used to wash some soil from the root ball, allowing you to gently free the roots. This is a particularly good method when the potting soil has become air dry and no longer holds water and roots have become more or less trapped within the dry root ball. Free any roots circling the bottom.
6. Place the plant in the hole, making sure it at the same depth in the soil as it was in the pot. Backfill the hole with soil then firm the soil down gently using your hands. Don't bury the trunk/stem, as this can affect the success of some plants.
7. Make a lip of soil around the base of the plant to hold water.
8. Sprinkle slow-release native plant fertiliser at the recommended rate around the base of the plant.
9. Soak thoroughly with water.
10. Place a layer of organic mulch around the plant. Take care to keep the mulch away from direct contact with the plant stem.
Fertilisers
You can use concentrated, fast-acting fertilisers, which will feed large amounts of nutrients to the plant quickly, or slower-acting, long-term fertilisers – there are many possibilities in between these two extremes. When using concentrated fertilisers, avoid direct contact between the roots of a young plant and the fertiliser. Usually coated, slow-release fertilisers are more appropriate with natives, particularly in sandy soils where nutrients can be leached out very quickly.
Be sure to check the phosphorus content of any fertilisers you intend to use and, for most native plants, avoid using large amounts of fertilisers containing more than a small amount of phosphorus. The exception is rainforest plants, which are less sensitive to phosphorus. Commonly used fertilisers that have high phosphorus levels include super phosphate, hoof and horn, and blood and bone. The toxic effects of high phosphorus levels can be offset if balanced with high levels of nitrogen. Generally, phosphorus toxicity is more of a problem in container-grown plants than in the soil, where phosphorus is often immobile (‘fixed’) in the soil. The addition of fertilisers containing calcium (eg. gypsum, lime) can make soil phosphorus more readily available. This can sometimes create toxicity problems.
Time of Planting
Planting is best timed to allow plants to settle in and establish before facing the harshest time of the year. The harshest time of year will vary from place to place, and may also vary according to the species being planted.
In temperate climates, planting may be done at any time of the year providing the plant will receive adequate water. In the southern states planting is best done in autumn or spring when rainfall is high, and there is adequate warmth in the soil to stimulate root growth. In tropical and sub-tropical climates planting may be better carried out after the hottest part of the year, but while the ground is still moist.
In areas with severe frosts planting is best carried out in mid spring after the threat of late frost has passed. This will give the plant time to establish before the following winter.
Always avoid planting on hot or windy days as plants are more likely to dry out in these conditions.
Staking
Staking is not always necessary, and in some cases, stakes do more harm than good. When movement of a plant in the wind is stopped completely, it may not develop sufficient strength in the trunk to withstand the wind when the stake is finally removed.
Plants should only be staked if they are likely to fall over because they are exposed to severe winds, or if they are likely to suffer from vandalism or unintentional damage. A tree guard may alternatively be used (eg. surrounding the plant with a plastic tube), to protect it from wind, vandalism and foraging animals.
When you do tie a plant to a stake, the tie should be loose allowing the plant to move about in the wind. If movement is restricted, the tree may never develop proper strength in its join between the roots and trunk. Do not drive the stake next to the trunk, as this will damage the roots and will prevent proper trunk development. Instead, use a flexible non-abrasive tie (such as thick, plastic-covered wires or nylon panty-hose) running between two or three stakes and the trunk of the plant. Be sure to check as the plant grows that the tie is not restricting its growth. Remove the tie after one season – by this stage the trunk will most likely be strong enough to support the plant.
Stakes can also be used simply as a marker (without ties) for small plants that may be overgrown by grass, before they have had a chance to get established and put on a spurt of growth. This makes them easy to locate when you are mowing, trimming, etc.
Mulching
Organic mulches have several advantages as follows:
- They help control weeds.
- They conserve soil moisture (helps prevent drying out).
- They improve soil structure as they decompose.
- They add nutrients to the soil.
- They reduce fluctuation in soil temperature.
- They can promote earthworms.
- They can reduce soil erosion.
Almost any organic material can be used as mulch. Here are just a few examples: wood chips, sawdust, tan bark, pine bark, leaf mould, paper, compost, straw, prunings, lawn clippings, cardboard. There are even some inorganic materials which are useful as mulches, including gravel, scoria, blue metal, coarse sand and river pebbles.
Wind can be a problem, blowing away lightweight mulches, such as wood shavings, when they are first laid down. Once thoroughly wet and settled, however, even these mulches tend to stay where they are.
- Black plastic placed under mulch will create an impermeable layer, causing plants to suffer from water stress. Sweating underneath may cause water to stagnate, creating foul smells and promotion of root diseases.
- Weeds need to be eradicated before the mulch is laid. A non-selective, non-residual herbicide, such as glyphosate, can be sprayed several weeks before laying the mulch.
- Maintenance is often ignored. Top up organic mulches regularly and remove weeds before they develop seed heads.
- Wood-shavings and some other mulches need to be kept moist for the first month or two. This will allow the mulch to settle and prevent the wind blowing away large amounts of material.
• As organic materials decompose, they draw on nitrogen from the soil. Plants which are grown in mulches made from shavings, wood chips and paper may show nitrogen deficiency symptoms (ie. the leaves will turn yellow). To counteract this, apply a small amount of sulphate of ammonia around the base of the plant, or some other nitrogenous fertiliser.
- Many organic materials actually repel water when they are dry. If mulch has not been thoroughly moistened when first laid down, rain can run off the surface to the sides of the plants. Dry grass clippings used as a mulch are particularly prone to repelling water.
 SPECIAL PLANTING TECHNIQUES
Most home gardeners shouldn't have too much difficulty in establishing new plants. In some areas, however, problems such as severe soil erosion and arid climate will mean that special techniques are needed to enable the plant to establish in its new environment.
Pocket Planting
This is simply establishing a pocket or basin on a slope. The soil excavated from the pocket is used to form a wall enclosing the pocket on the down-slope side. The wall will then retain water and help prevent soil erosion. An overflow spillway in the wall will prevent the pocket from being washed away in heavy rains. The pocket may need to be reformed every now and then, until the plant is established.
Slope Serration
Sloping sites can be terraced to enable plant establishment and reduce erosion. Slopes are cut into steps, which are approximately 1 m wide, with the steps sloping back towards the hill to retain water. Over time, the steps will erode; however, the plants will usually have become established by then. The loose soil from the eroded steps also provides favourable germination sites for seed which is dropped from other nearby plants.
Wattling
This technique relies on the use of bunches of branches placed on slopes to prevent erosion. Bundles of long, slender branches are tied into bundles and are partially buried in contoured trenches which have been cut across the slope, or cut branches and dried brush are simply spread across the surface of the slope. Chicken wire mesh or strands of fencing wire are sometimes pegged down on top of the branches to hold them in position. (Some types of wire mesh can lead to zinc toxicity, particularly on moist soils.) Layers of straw, or commercially available synthetic matting, can be used to similar effect.
This technique has been more commonly used overseas, although it can be used here on badly degraded sites to enable native species to regenerate. In Australia, dried brush (eg. Leptospermum) is more commonly used. This type of brush material often contains large quantities of capsules that release seed, which will often readily germinate on the newly stabilised slope.
Planting Arid Sites
Plant establishment in non-irrigated, arid sites can be extremely difficult. Mulching, controlling competing weed growth, wide spacing of plants, and creating saucers of soil to retain water, are simple ways of overcoming the water shortage problem. Smaller-sized plants also have a better chance of becoming established.
Condensation traps have also been used with some success in areas with clear night skies. One simple method of trapping the moisture from condensation is to construct a 1.5m diameter planting basin with a depth of 30 cm. The plant is placed on a mound in the centre and polythene sheeting is arranged to collect evaporating soil moisture, which condenses on the sheet and drips back to the ground.
Direct Seeding
Direct seeding is a low cost method of re-establishing vegetation, although the results are less predictable than transplanting established nursery-grown plants.
The most important factor is to eliminate weed growth before seeding to remove competition from the germinating seeds. An initial spray with chemical herbicides will give the best results; alternatively cultivation can be used to encourage dormant weed seeds to germinate which can then be sprayed. A light cultivation of the soil will also provide favourable germination conditions for the seed.
Seed can then be broadcast either by hand on small sites, or by direct drilling or mechanical hoppers for larger areas. Fencing the site and follow-up weed control may also be required. Irrigation, or timing your seeding to make the best use of rainfall, will help the germinating seeds to get a good start.
In areas where there is an existing cover of native vegetation, natural regeneration can give good results. The site should be fenced off, and the weeds on the windward side of the tree (where seeds are most likely to drop) should be removed.
WHY THIS COURSE?
This comprehensive course is right for you if :
- you want to be an expert in Australian natives plants
- You work in an Australian plant nursery
- You work on rehabilitation programs
- You want to design Australian native plant gardens
- You would like to explore other business opportunities such as identifying and selecting Australian native species for the cut flower industry.
Our tutors are there for you - they will guide you through your course on a one to one basis. We encourage students to contact tutors for help as needed and we pride ourselves on producing quality graduates!
